Showing posts with label DIY. Show all posts

Friday, February 18, 2011

DIY Friday: Colorful Vase

Craft a centerpiece with pizzazz

Want a way to add color and print to that glass vase? Fabric and ribbon is an inexpensive and cute way to dress up a clear vase for your table centerpiece. The picture above is actually done with a cloth napkin!

Here is how to do it:
Unfold a napkin(or fabric), and set the vase in the center. Pull the napkin edges up, gathering the fabric, and tuck them over the lip of the vase. Make sure the napkin isn't touching the water or the cloth will become soaked. Wrap a ribbon around the neck of the vase and tie it in a bow.


Image and directions via AllYou

Friday, January 7, 2011

DIY Friday: Paper Candle Holders

I love these candle holders. You can use the prints provided by MarthaStewartWeddings or you can find some of your own. These would be perfect for a rehearsal dinner or a wedding brunch!
Print clip art onto standard-weight 11-by-17-inch paper (if your printer does not handle this size, copy the clip art onto a disc or thumb drive, and take it to a copy shop or office-supply store with a printing department).
Then, cut the templates to fit various heights of square candle holders or vases (to shorten the wrapper, cut away excess from bottom by the stem). Wrap around candle holders, and secure with double-sided tape.
To finish the bottoms, wrap green grosgrain ribbon around the candle holder, and secure with double- sided tape.
Rose Centerpiece PDF
Tulip Centerpiece PDF
Ranunculus Centerpiece PDF

Image and text via MarthaStewartWeddings

Friday, December 24, 2010

DIY Friday: Holiday Glam

Painted Pine Cones
Tree branches, pine cones, ornaments and candles.

You can do so much with  these four things.
You can spray paint the tree branches and pine cones. Get ornaments that are the colors of your wedding. They can hang from the branches and be placed around the tables. You can also get glass vases and put the ornaments in those. The possibilities are endless. The best part is the tree branches and pine cones can be free (just go to your backyard or local park). Buy the ornaments after Christmas so you can get them at a discount price. 

Image via thenateshow.com

Friday, December 17, 2010

DIY Friday: Flower Box

A Lovely Box of Pink Roses with Satin Bow - Wrapped in Love

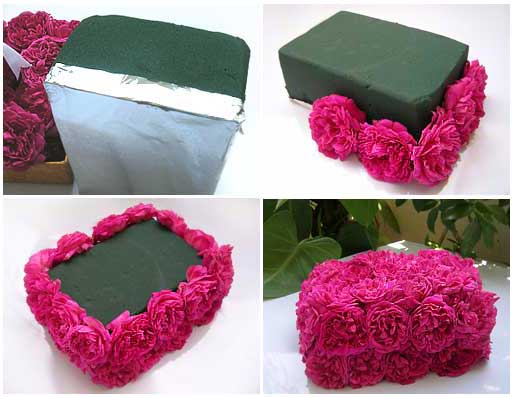
I love this flower box! This one is made out of roses, but you can make it with almost any flower. Carnations are inexpensive and look wonderful when there are a bunch of them together. 


DIY Tutorial on Gifting Roses Box or Making a Floral Centerpiece
Step 1: Line the base of the florists foam with foil or plastic (to prevent water leakage).
Step 2: Starting from the base, start inserting roses onto the foam.
Step 3: Line up the roses in straight lines and fill the top. You could use single color, double color, multicolor or color gradient flower lines.
Step 4: Firmly press the flowers all around the brick. Check for any loose insertions and adjust accordingly
I personally think it looks better without the ribbon. You can do this with any styrofoam shape. If you do a circle one of these, put a candle in the middle and it will make a great centerpiece.
Images and instructions from WanderingMist

Friday, December 10, 2010

DIY Friday: Holiday Table Decor


There are so many great ideas in this picture.
I love the vases. Fill a clear vase with water, place berries in it, then a floating candle.
 You can get pine cones at a park or at your local craft store.
You can even spray paint the pine cones to make them match your color scheme. 

Branches of pine needles bring a wonderful smell and tons of color to your table.
Place the pine needles around the vases or make groups of them place colorful pine cones or candles on them. Even if you are not getting married, this is a great way to dress up your dinning room table for your holiday dinners. 


Image via thenateshow.com

Friday, December 3, 2010

DIY Friday: Going Green with Christmas


Woohoo! Our 100th Post! Yesterday on Good Morning America they showed some great DIY wreaths that you can make with stuff from around your home. My favorite is the old ornaments on the coat hanger. Watch the video for all their great ideas and check out below on how to make the coat hanger wreath!

You'll need recycled ornaments, a coat hanger, ribbon, glue and duct tape.
 Bend the hanger to form a wreath/round shape.
 Attach the tops to the ornaments with a glue gun with a dollop of glue so the ornament tops are secure.
 String the ornaments on the hanger, creating a full appearance.
 Connect the ends of hanger with a piece of tape.
 Add a bow to top of wreath. The bow will camouflage a thinner appearance at the top of the wreath where the two ends of hanger connect.

Directions and video via GMA

Friday, November 26, 2010

DIY Friday: Paper Canopy


Want a unique and cute ceremony canopy? Check out this paper canopy. The canopy can be any color you find the paper in and can be as big as you make it. If you have your reception in a pavilion at a park these honeycomb-paper garlands are a great way to liven up a old concrete pavilion.


Tools and Materials
20 to 28 "Leaf" or "Arcade" honeycomb-paper garlands
3 3/4-inch-diameter PVC pipes cut to 5 feet in length
2 PVC corner joints
14-inch round-bottom lampshade ring (or 14-inch wreath ring) 
Monofilament
Clear packaging tape
5 Command-brand removable self-adhesive hooks

Pop-Up Paper Canopy How-To
1. Connect the three PVC pipes to the corner joints to create a horseshoe shape. Tie monofilament to the four corners of the U pieces. Attach hanging hardware, such as a Command hook, to the ceiling (one above each corner) and attach the monofilament so the PVC frame hangs approximately 6 feet (or more if your groom is taller) above the floor, with the open end of the U facing the audience.

2. String garlands onto the lampshade ring. Close the ring by wrapping the opening with tape.
3. Divide the garlands into four sections and tie monofilament to the ring between each section. Bring the four lines of monofilament to the center of the ring and knot together.
4. Tie another piece of monofilament to the X in the center of the ring. Secure a self-adhesive hook to the ceiling and tie this last piece of monofilament to the hook so it is centered approximately 30 inches above the PVC frame.
5. Drape garland over the PVC frame, grouping or gathering at each corner.

Resources
PVC pipe and pieces from Home Depot, "Leaf" honeycomb garlands from BulkPartySupplies.com, lampshade ring from The Lamp Shop.


Images and text instructions via MarthaStewartWeddings

Friday, November 19, 2010

DIY Friday: Ribbon Save the Date

When I look at all the different DIYs out there for brides, I have no idea how I would narrow it down if I could do it all over again. There are so many cute and creative ideas that it is hard to just choose one save the date, ceremony booklet, and menu card. Jennifer is one of my favorite DIY brides. Her save the date was inspired by a Martha Stewart Weddings DIY and she personalized it to fit her wedding.

Jennifer's blog post on her save the date

I love the ribbon attaching the numbers and how your guests pull the date out of the envelope.
Below is a picture and link to Martha Stewart's Ribbon Save the Date.
You can tie in all the colors of your wedding with these.
 All you need is paper, ribbon, envelopes and friends to help you do this cute save the date.


Image 1 via Jennifers Blog
Image 2 via Martha Stewart Weddings

Friday, November 12, 2010

DIY Friday: Candles + Leaves = Fall Loveliness

For many of us fall is coming to an end and winter is here. But since it is November we still have Thanksgiving colors all around us in decor. Here are two great ideas for a November wedding.


All you need for this DIY is a cylander glass vase, leaves (fake or real), ribbon, and a hot glue gun.
Many times you can find the tall cylinder vases at the dollar tree for $1. If they don't have them then you can get them at WalMart or Michaels for around $4.
It would be easiest if you hot glued the leaves on to the vase so they do not move when you tie the ribbon around it. 


For these vases you can get a bunch of berries and place them in a glass vase
or take leaves and glue them to the vase.

Images via Allyou.com

Friday, November 5, 2010

DIY Friday: Escort Card

Need an easy and cute escort card? Check out these cute and simple DIY ideas!


Images via theknot.com

Friday, October 29, 2010

DIY Friday: Pumpkins + Ribbon = Fabulous

Todays DIY is ribbon wrapped small pumpkins.
They can be used as table decor or favors.


Check out this video from BHG on decorating your pumpkin with ribbon

Image via Goodhousekeeping.com

Friday, October 22, 2010

DIY Friday: Ribbons and Flowers


Flowers and ribbon. There is so much that can be done here. I hope these two ideas from AllYou inspire you to make something super cute for your wedding date. I especially love the first pic. You can get those pots at WalMart or a craft store and paint them any color. 


Images via Allyou.com

Friday, October 15, 2010

DIY Friday: Pumpkins and Candles

I couldn't just leave you with one day of DIY pumpkins this October. I hope you are inspired by these pumpkins that work great as candle holders

Simple and elegant.


I love the small pumpkins on the tall candle stands.
You could even carve out the middle of the pumpkin and put a candle in it.
With a small pumpkin it would look more like a candle holder then your usual carved pumpkin.

 These pumpkins have leaves painted on them. My favorite ones are the two in the back.

I would love to see this pumpkin spray painted silver with a white or orange candle in it.

Images 1 & 2 via Goodhousekeeping.com
Images 3 & 4 via bhg.com

Friday, October 8, 2010

DIY Friday: Pumpkin Vases

Pumpkins pumpkins everywhere. Pumpkins can make great vases for a October wedding. Here are a few DIY ideas to bring decor to your ceremony or reception.

I love this pumpkin vase! Take some sticks and spray paint them black.
Cut a small whole in the top of the pumpkin then stick the sticks in it.
You can leave it like that, hang a  table number from it, or hang escort cards from it.
Dont forget about those great white painted pumpkins at the bottom of the picture!


You could paint your monogram or wedding date one the pumpkins.
Then cut a small whole in the top to put flowers, or even sticks with crystals or fall leaves hanging off of them.


This pumpkin vase uses wire that is twisted then put in the bottom. Then cut a whole in the top and put in your favorite flowers. I think white spider mums would look great in this!

Images via Goodhousekeeping.com

Friday, October 1, 2010

DIY Friday: Sail Save the Date


A beach wedding wouldn't be perfect without a beach themed Save the Date. Today's Save the Date comes from BroadwayPaper. I hope you enjoy making these for your beach wedding.

Materials
white linen card stock
white a2 envelope
navy linen card stock
lollipop stick
cloth covered wire
gift wrap

Tools
mono adhesive
hole punch
ruler
x-acto knife
scissors
silver spray paint


Directions
    • On the computer out your save-the-date text to fit into a right triangle (“sail”) that measures 4 x 3.75.” You can print multiple copies on an 8.5 x 11” sheet.
    • Print on white linen card stock, then trim to size with a ruler and x-acto knife.
    • Punch three holes on the long side of the right triangle.
    • Spray paint your lollipop stick and let dry.
    • Cut three small pieces (about 3” long each) from the cloth covered wire and twist through the three holes in the “sail” and around the silver lollipop stick.
    • To keep intact in the mail, back the sail up by attaching it to sheet of navy linen card stock for additional support. Our piece measures 4.25 x 5.5.” Cut slits in the support card stock using a ruler and x-acto knife and slide the lollipop stick through the slits to secure it.
    • We’ve included the return address on the back flap of the envelope; however some at-home printers are unable to print on envelopes. In that case, your local printer would be happy to do this for you. If you can do this at home, set your text up to print on the back flap of the envelope. Measure the width of the envelope, to be sure your text doesn’t run off the edges. Print your text on your envelope flap in navy blue ink.
    • To create the envelope liner, take your envelope and place down on the back of the gift wrap. Trace with a pencil around the envelope.
    • Trim the liner out with scissors or an x-acto knife and a ruler. Then trim a 1/2” piece from the bottom of the liner.
    • Tuck the liner inside the envelope and fold the flaps of the envelope and liner down.
    • Pull the envelope flap away from the liner and roll mono adhesive along the back of the liner.
    • Press the liner and envelope firmly to adhere.
  • Image and text via BroadwayPaper

Friday, September 24, 2010

DIY Friday: Rustic Cake Stand


This rustic and unique cake stand DIY comes from Oncewed.com I love unique cake stands and this one would be great for any outdoor wedding. 


What You’ll Need
A Cross-Cut Wood Plaque (round or oval)
A Cross-Section of a Tree Limb   (Make sure the top and bottom are parallel)
Titebond Ultimate Wood Glue (or a similar extra strong wood glue)
A Large Wood Clamp
Instructions
Cross-cut wood plaques can be found in your local craft store or online at Hofcraft. The come in a variety of sizes ranging from 5 inches to 12 inches in diameter.   They are usually found in the section with the wood-burning kits and other wood crafts.  They are clean, sanded and ready to use.
1.  Take your tree limb section and wipe the cut surface clean.   Put a generous amount of extra strong wood glue on the surface. (see figure 1)
2.  Place the limb section in the center of the back side your wood plaque and press down firmly.  Wipe away any excess glue with a clean, damp cloth. (see figure 2)
3.  Place the two joined pieces in a wood clamp and let dry for at least one hour.   If you don’t have a wood clamp, you can stack a few heavy books on top of your pedestal until it’s dry.   (see figure 3)
4.  Use your pedestals to display cakes and desserts (see figure 4) or use as a base for a centerpiece.   If you want to place food directly on the wood surface, coat it first with a food-safe wood sealer.  If you would like to keep the wood it’s natural color, place a piece of parchment paper beneath your cake or dessert.
What it Cost
Wood Plaques $3.99 – $5.99 each
Tree Limb – Free from our wood pile!
Wood Glue – $3.35

Image, and text for supplies, instructions and cost via Oncewed  by Laurie Cinotto

Friday, September 17, 2010

DIY Friday: Pom Pom Car Decor

This is way too cute. Check out these tissue paper pom pom car decorations
from Martha Stewart Weddings.


So get together with the girls and have fun making this colorful decor

Image via Martha Stewart Weddings

Friday, September 10, 2010

DIY Friday: Save the Date


Want a Save the Date on a small budget? Consider looking at Target or similar stores. I went to Target to the card section and found blank cards with flower petals and leaves imbedded in the paper. They are regularly 25 for $10 but I got these on sale for $5. I went home and found a save the date style I liked online and recreated it in publisher.
You can choose any font and color that you want to make it fit with your wedding. Print them off at home and have 100 custom save the dates for under $25.  
I also found similar design in invitations at office supply stores that can be used as a matching wedding invitation to go along with the save the date. 

Friday, September 3, 2010

DIY Friday: Tissue Paper Napkin Ring


Today we have more reception decor to go along with the tissue paper pom poms .The tissue paper napkin rings, from Martha Stewart, are really simple and look supper cute with any table decor. 

Supplies: Tissue paper, scissor, floral wire- 22 gauge, and a ruler.

1. Take on piece of tissue paper and fold it in half twice. This will allow you to have four layers.
2. Cut a 10 by 5 inch rectangular through all the layers.
3. Make 3/8 inch wide accordion folds (the tissue paper should be folded so that it is narrow, not the long way).
4. Fold an 18 inch piece of floral wire in half (depending on the thickness of your napkin you may  be able to do just a 10 inch piece of floral wire). Slip the wire over the center of the tissue paper and twist to secure.
5. Trim the ends  of the tissue paper into round or point shape.
6. Separate the layers, pulling away from the center one at a time.
7. Bend the wire into a loop to fit around the napkin, twist the end to secure (if you want the napkin to slip out of the napkin ring for your guests, make sure it is a little loose).


You should be able to get two napkin rings out of one piece of tissue paper.

Friday, August 27, 2010

DIY Friday: Picture Frame Photobooths

I love Photobooths! They are a great way to add fun and uniqueness to your wedding reception but to rent one can cost $800 for just two hours. Having fun should not break the bank, and thankfully there are ways to have a photobooth without paying so much.
A couple weeks ago I saw a wedding where the bride and groom made their own photobooth. I was amazed at how creative they were!


They took a big piece of plywood and cut holes for the picture frames. They put wall paper over the plywood to make it look pretty. They placed empty picture frames on the edges of the holes they cut. Guests could then go behind the photobooth and put their heads in the empty frames for their picture. They also hung picture frames with their pictures and old wedding photos from their parents on the plywood. They made a mount for the plywood and hung fabric at the bottom so the mount didn't show.

To the side of the photobooth they had a stand with a sign on it. It said
Photo Booth
 "Strike a Pose"
Thank you for sharing our special day
and giving us memories to last a lifetime.
They had two disposable cameras hanging from the stand that the guests could use to take pictures at the photobooth.

I hope this idea helps you add some fun to your wedding reception!